Need to convert some text from one programming language (or markup language or format) to another? It can betempting (and fun) to write a script that converts the whole job “automagically,” or maybe you can find a converter somewhere. But if the original file was hand-coded or is so complex that parts of the conversion are devilishly hard to get right, automating the task can take more time to perfect than it saves you. And unless you have an automated validator to check that the conversion was done correctly, you may have to inspect the result line-by-line anyway.
So, if doing the job automatically makes your head hurt too much (or if you’d rather be playing a game of Freeciv, http://www.happypenguin.org/), consider automating just part of the job — or doing all of it semi-automatically.
This month, let’s look at one way to do a job like this: with a set of handwritten macros for a text editor. (A macro lets you type a key or two to perform one or more editing steps in a flash.) We’ll use vi, because your columnist’s fingers are well-trained for it, but another programmable editor, like Emacs, should be at least as good. The important thing here is the way to design and use these macros, not which editor you choose.
Let’s look at a specific example: a small part of a job to convert a web site coded in HTML (the busy Google Guide site, https://www.googleguide.com/) into DocBook XML format (see https://www.docbook.org/). Again, this article isn’t just about converting HTML into DocBook. It shows techniques for writing macros for any type of editing job.
First Step: Analyze the Job
Let’s say that you’ve tried a to completely automate the conversion. You’ve written a sed or perl (or whatever) script, or you’ve tried an XSLT converter, but your solution keeps failing miserably. Or worse, it fails subtly in ways that are hard to spot.
Try breaking the job into pieces. Search through the original files. Try the Swiss Army Knife of pagers, less, and some of its handy searching and highlighting features, such as the -a and -j options. Or use grep or egrep with the handy options -C, -A, -B, and --color==always and pipe that output to less -R.
Decide what parts of the job are easy to automate. For instance, maybe every second-level heading in an HTML file nicely uses both <H2> and </H2> tags. Or maybe only a couple of them are missing the closing tags, which you can quickly add with a text editor. Then a quick-and-dirty script in a loop can blast through the files, finishing that part of the job in a flash and leaving the rest to do by hand.
Listing One shows a fragment of Google Guide’s hand-coded HTML 3.0 before conversion. Listing Two shows the same text after the semi-automated conversion.
As we mentioned in <a href=“google_works.html”>How Google
Works</a>, Google indexes sites with two types of crawls,
<a href=“google_works.html#freshCrawl”>fresh crawls</a>
and deep crawls.
As we mentioned in <xref linkend=“google_works”/>,
Google indexes sites with two types of crawls, <link
linkend=“google_works-freshCrawl”>fresh crawls</link>
and deep crawls.
The main reason to do this job by hand is that you need to decide about each of the HTML <a> (link) tags: should it become a DocBook <xref>, <link>, or <ulink>? Does it have attributes like class= or target= that need some thought? Also, because the original HTML was written by hand, the elements of each tag may be in different orders, may or may not use quotes, and could have errors. (Web browsers are forgiving of errors, but DocBook requires valid XML.) A little personal intervention is just what’s needed.
Use Revision Control!
Before you start a complex job, consider archiving the original files using a system like the venerable RCS or the modern Subversion. Then periodically commit (check in) the changes, with a detailed log message about what you did and why. There are (at least) three reasons:
*After you make an editing pass through one or a series of files, running rcsdiff or svn diff shows you exactly what changed so you can be sure it’s right. If it’s not right, co or svn revert brings back the previous version, so you can try again.
*When you come in to work again the next day or the next week (or if you lose your mind playing Freeciv), reading the log messages will remind you quickly what you’ve done so far.
*If you later find a problem in one of the steps, you can use rcsdiff or svn diff see what happened in each step. Then you can craft a patch to back out those changes and/or re-do them correctly. (Or, at least, you can spot the changes and copy-and-paste the old text on top of the current file.)
No, This Column Is Not About vi, but...
The techniques shown below apply to most any interactive editor macros. To explain this month’s examples, though, requires a little bit of knowledge about vi macros.
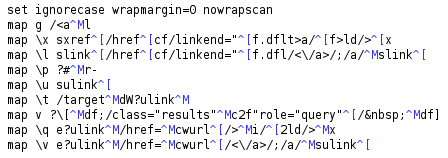
Each vi macro has two parts: a name (a string of one or more characters that you type to invoke the macro) and a value (the commands you want to run and any text you’re adding). Figure One has examples.
By the way, if you’re a long-time vi user, you may not know that vim (vi i m proved) has built-in scripting. As one example, you can set numeric variables, perform math on them, and output those values into the files you’re editing. See vim ‘s extensive built-in help (type :help) for details.
vim also has the new q command which records your keystrokes into the named buffer (a through z) that you choose. For instance, qa starts recording keystrokes into buffer a, continuing until you type q to stop recording. To “replay” the commands from buffer a, type @a.
Writing Macros, Overall
Older versions of vi had some unused keys that were perfect for defining as macros. Now vim has defined many more commands, including some multi-key commands. To choose a macro name in any editor, consider whether you’re overriding the definition of a command that you want to use.
Techniques for writing macros include:
*Break the job into pieces. A macro can do one or more operations. Look at the source files and decide how to divide the job into reasonable “chunks.” (You can pick the “chunks” by inspection or by experimenting to see what works.)
The example shown here converts HTML <a tags. So, the first macro might change the opening <a into <xref, <link or <ulink, possibly also converting the href= into url= or linkend= as needed. The next macro could search forward for an = to draw your eyes to see whether an attribute’s value needs quoting — and if so, a third optional macro could do that.
*If some part of the text you’re converting is always written the same way, try doing all of that job with a single macro. On the other hand, if the text is inconsistent, do the work in smaller chunks, using short macros that do just one or two operations, so they’re more likely to succeed and you can inspect the results after each step.
*Use mnemonic macro names. Here, the \x macro starts making a DocBook xref element, and the \l macro starts making a link element. Mnemonic names help you remember which macro to use where.
*The first macro can search for the next place that editing is needed and stop there to let you look at the place and be sure it’s ready for the next step. The example g (“go”) macro searches for the next occurrence of <a, which is usually the next link to edit. In the irregularly-coded files we were editing, the <a might come at the very end of a line, so we didn’t search for more than those two characters.
Using a simple search lets you glance at the spot where the macro took you. If it’s the wrong spot, re-run the macro to find the next spot.
*To make macros work reliably, each might begin or end by returning to a known starting place in the file. Each subsequent operation can start by searching forward for the next part of the tag that you want to edit.
For instance, if editing an <a tag, some macros might start by searching backwards for the previous <a. Alternatively, when your first macro finds a spot, it can set a mark (in vi, the command ma marks the current spot as position “a”). Then subsequent commands can go back to the mark (in vi, `a goes to position “a” and 'a moves to the start of that line).
*Starting all of the macros with the same key (in vi, a backslash, for instance), or key sequence (in Emacs, something like C-x) makes it easy to leave your fingers in the same place for the first character of a multi-character macro name. This also makes it easy to type both characters of a multi-character name before the editor “times out” and decides that you aren’t going to type any more. (In vim, the ttimeoutlen option sets the time delay.)
Introducing the Example vi Macros
Macros are typically defined in a file. Macros are also usually used in a sequence. Which macro you use when depends on what situation comes up.
There’s not room in these three pages to explain vi macros (or Emacs, for that matter!) so we won’t cover these in depth here. Figure One shows the macros. The embedded control characters (^M for carriage return and ^[ for Escape) are shown in blue so they’re easier to spot. If you know how to write vi macros, you might compare these macros to the before-and-after shown in Listing One and Listing Two, respectively.
The macros are listed roughly in the order they should be used. In vi, it’s probably easier to save the macros in a file than to type them interactively. Then it’s easy to edit the file and read it into the editor (in vi, that’s :source filename) to use your newest definitions. (However, some old versions of vi tend to be “confused” by redefining macros during a session; it could be better to quit the editor and re-start it.)
The first line in Figure One sets three vi options: making searches case-insensitive, not line-breaking text that crosses the right margin, and not letting a forward search“ wrap” to the start of the file. These help the macros work consistently (though you may not want these, and you may want others.) The other lines are macros; all are of the form map name value.
As was already mentioned, the g (“go”) macro searches forward for the next HTML <a tag. Next, you would use one of the three macros:
*\x changes the entire <a tag to an <xref tag. The original tags have <a href=“foo.html”; this macro changes that to <a linkend=“foo”. It also searches for the first >, adds a / before it, and deletes everything afterward, through the closing </a>. If the conversion looks okay, use g to move ahead; otherwise you can fix the problem on the spot.
*In the same way, \l changes the entire <a tag to a <link tag. If the original tag looked like <a href=“.#.”, you’ll next use \p (mnemonic:“ pound sign”) to search backward for the # and change it to a -.
*If the <a tag should become a <ulink tag, the first step is \u. There are several different ways to code a <ulink tag, so you might choose one or two of the next three macros (v, \q or \v).
Exactly what these do is too complicated and obscure to spend time on here. The main idea is that you choose what to do next by inspection, and after you use a macro, glance at the result to be sure it’s okay.
(vi can edit multiple files one at a time with its commands :n, :w, and :set autowrite, among others. Emacs can also handle multiple files, in multiple buffers, without restarting. Howeevr, you may find that editing files one-by-one is least confusing.)
Converting each HTML tag took between 1 and 5 seconds. (Describing it takes a lot more time than doing it!) Your eyes get used to recognizing the way that each macro should work, so problems jump out at you in a flash.) If something didn’t work, you can see it immediately and either fix it by hand with other editor commands, or you can edit your macro (s) to work better.
This isn’t intended as a complete explanation of every detail. It’s just a flavor of the steps to take: searching through each file with the g (“go”) macro to find the next <a> tag, deciding what to do to convert it, then repeating the cycle until vi determines there are no more <a> tags (that the search has failed).
Again, no matter what programmable editor you choose, it’s good to analyze the problem first: Decide what parts of the job you can automate completely and which parts should be done with this semi-automatic, step-by-step, inspect-fix-and-inspect method.
Jerry Peek is a freelance writer and instructor who has used Unix and Linux for 25 years. He’s happy to hear from readers; see https://www.jpeek.com/contact.html.
[Read previous article]
[Read next article]
[Read Jerry’s other Linux Magazine articles]