Just in time for your summer (in the Northern Hemisphere, anyway) vacation photos, let’s look at image hacking with ImageMagick (https://www.imagemagick.org/).
ImageMagick (or IM for short) is a package of programs for creating and manipulating images: photographs, vector and raster drawings, and more. It’s been in development for almost twenty years, and a lot has changed since it was first posted to comp.archives on Usenet in 1990. The package is freely-redistributable, although some parts of the code came from other packages and have different license terms. See http://studio.imagemagick.org/script/license.php and http://studio.imagemagick.org/script/notice.php.
Most of the tools work from the command-line, at a shell prompt, and also, of course, from scripts and anywhere else you can run a program. ImageMagick has multiple APIs — for C, Ch, C++, Java, Lisp, Pascal, Perl, PHP, Python, Ruby, and Tcl/Tk — but we’ll cover the command-line here.
Not everything you’d want to do to an image is easy to specify by typing text on a command-line, of course. But for some jobs, especially repetitive tasks like resizing or annotating a series of images, tools like IM are fastest. IM also has many more features than you’ll find in simpler GUI tools. There are Windows and Macintosh versions of IM, and one for Cygwin too.
This month we’ll cover the basics and try some useful examples. Next month, we’ll go into more detail. Still, there’s no way we can cover more than a small part of this feature-rich package. (The sidebar “Netpbm” describes a similar package.)
Editing Images from the Command-Line?
Why would you want to use the command-line if there’s a free, interactive, GUI tool like The GIMP that’s also programmable? (For more about programming The GIMP, see http://www.linux-mag.com/2002-01/power_01.html.)
*IM’s large selection of APIs make it easy to edit images from an application, including from a Web server or other on-the-fly image processing. The tools are smaller and faster to load than a large application like GIMP.
*IM lets you make sophisticated choices of exactly how your image is processed, something that most GUI editors don’t. For instance, it has a big variety of resampling algorithms, so you can choose the best one for a particular image. Set the image depth (the number of bits per pixel); choose the number of colors; the way that pixels, and bytes in each pixel, are stored; and more.
There’s no need to make all of these choices when you process an image, but they’re available if you need them. If you can specify the job exactly — for instance, scaling an image from one size to another — using the command-line can be faster than opening an interactive editor. That’s especially true when you’re processing a series of images, such as creating image thumbnails for a web page.
ImageMagick Tools
The latest version of IM (as of this writing) is 6.2.6-5. Some major binary package distributions lag behind the bleeding edge. To see what version you have, add the option -version to any of the IM utilities (for example, convert -version).
To get the very latest version, go to https://www.imagemagick.org/. You may also need to install a number of delegates, programs to handle various image types. See the README.txt file in the source tree for information.
ImageMagick has ten command-line utilities. We’ll look at only a few this month.
*convert is probably the most-used. It reads and processes input files, then creates an output file. It can convert formats, resize, crop, and much more.
*composite overlays one image onto another. Images with transparent pixels (an alpha channel) are handled correctly.
*display is an interactive tool that displays and edits images under the X Window System.
Some fairly short HTML documentation is installed with IM. The URLs are hardcoded into the (even shorter) man pages.
The command-line (Important!)
Most of IM’s power is in its more than 100 command-line options. The options are used in a way very different from traditional Linux/ Unix utilities.
Beginning with IM version 6, the command-line order is crucial. The command-line is read from left to right, and you must specify files and options in the order that IM should do the corresponding operations. (IM also tries to handle pre-V6 ordering, but that wasn’t as precise.)
A few of the options provide overall settings, and those options typically come first. Other options (better called operators) and arguments come in the order they should take effect. The last argument is usually an output filename. For instance, when creating an output image, set its size first, then read the input images, then manipulate the result.
As an example, the command-line at the top of Figure One creates three vertical rectangles in memory, each 20 pixels wide by 40 pixels high (xc: followed by a color name or specification makes a single-color image.), appends the three rectangles into a single image, and writes the result to a file.
$ convert -size 20x40 xc:blue xc:white xc:red +append out1.png

The command in Figure Two creates the first two rectangles, appends them to become a single image, then rotates that image by 90 degrees. After that, a third rectangle is created and appended, and the result is written to out2.png.
$ convert -size 20x40 xc:blue xc:white +append -rotate 90 xc:red
  +append out2.png

Figure Three uses the same command-line as in Figure One, but adds -rotate 180 after the +append operator. Because the +append has joined all three rectangles, the -rotate rotates the entire image.
$ convert -size 20x40 xc:blue xc:white xc:red +append
  -rotate 180 out3.png

When you read more than one image into memory, you’re actually creating an image sequence that you can manipulate in a lot of ways, globally (to each image in the sequence) or individually (just one of the images). There’s much more information about command-line ordering and the image sequence in Anthony Thyssen’s IM6 basics page, http://www.cit.gu.edu.au/~anthony/graphics/imagick6/basics/.
Format Conversion
IM can handle a lot of file formats. The formats it supports are chosen when you build it.
As was said, the convert utility reads the command-line from left to right. All filenames except the last are opened and read into memory (as an image sequence). The result, after all processing, is written into the last filename.
One of the simplest uses of convert is to convert an existing image from one format to another without modifying it. Give two filenames: the one to read and the one to write. To convert a BMP file, say icon.bmp, into PNG format, do:
$ convert icon.bmp icon.png
Not all formats are created equal, as the sidebar “File Formats” explains. If you aren’t sure which format to use, do some studying and experimentation. IM is great for this: it’s easy to produce a lot of versions in a short time.
Listing One shows a loop that converts an image to three other formats and runs the IM display utility in the background to show each output file. ls -l shows the image sizes.
$ for type in gif jpg png
do
> convert logo.tif logo.$type
> display logo.$type &
done
[1] 10302
[2] 10304
[3] 10306
$ ls -l logo.*
-rw-r-r- . 15015 . logo.gif
-rw-r-r- . 9864 . logo.jpg
-rw-r-r- . 36443 . logo.png
-rw-r-r- . 291126 . logo.tif
Figure Four shows the three display windows. To magnify an image or do any of a number of operations, left-click on the display window for a menu. Typing q in a window closes it.
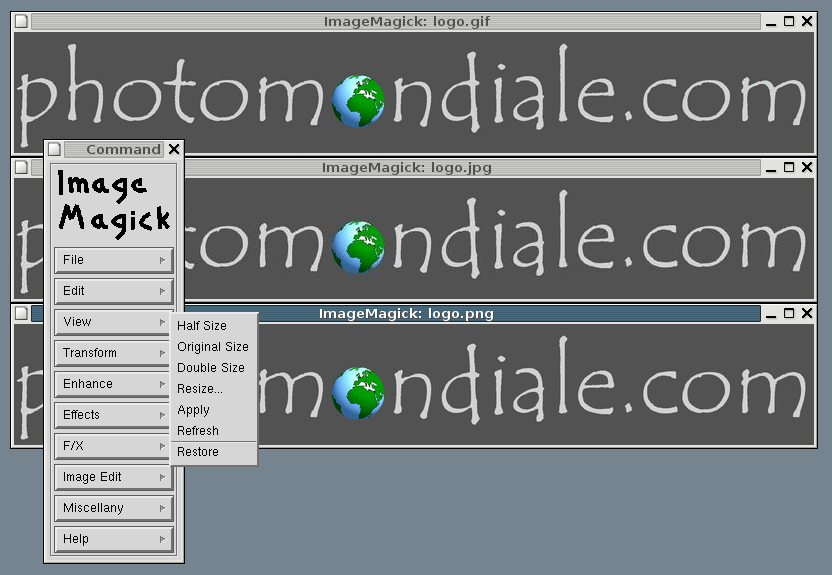
(You can click for a larger view.
Use your browser's “back” button to come back.)
Image Composites
ImageMagick is great for processing a series of images in the same way. Pick the parameters, then use a shell loop to run the same command on each image.
Labeling images with a logo, copyright, or other annotation is one example. The IM convert utility can create text images with transparent backgrounds (alpha channels) that work well. (Save these in PNG format; it supports transparency.) The IM composite utility overlays images.
It may be easier to create logos in an interactive editor. Figure Five shows part of a logo with text and graphics in a GIMP window, magnified 400% to make pixel-by-pixel editing easier. The checkerboard background helps you see transparent and partly-transparent pixels.

Use your browser's “back” button to come back.)
The logo, in toplogo.png, is 320 pixels wide by 49 high. It should be on top, so it goes first on the command-line. The image underneath, which is the second file on the command-line, is image.png, at 640x512 pixels; the output file will be the same size. The output filename, image_logo.jpg, comes last. Figure Six shows the result.
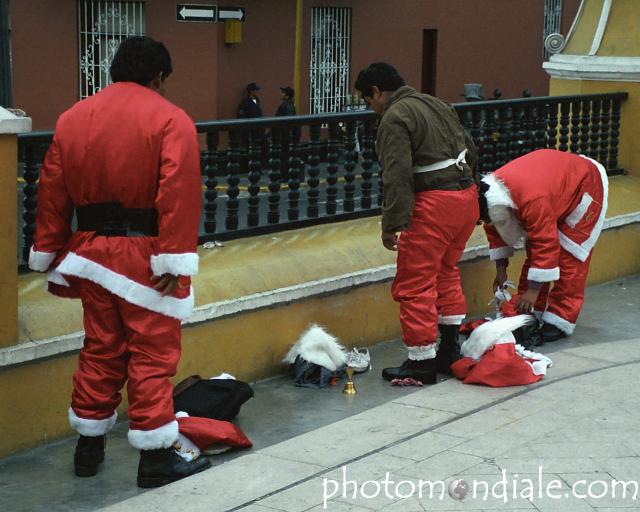
The -gravity option controls placement of the top image. (Clicking helps you see it.) The bottom of the image is South, the right is East, and the bottom right (the location for the logo) is SouthEast. So the command-line is:
$ composite -gravity SouthEast \
   toplogo.png image.png image_logo.jpg
More to Come
We’ve hardly scratched the surface of ImageMagick. Next month we’ll dig in more.
In the meantime, a great place to learn much more is Anthony’s IM example pages at http://www.cit.gu.edu.au/~anthony/graphics/imagick6/.