This month, we’ll take our third and final look at transferring files between systems. The utilities we’ll check out this month, rsync and unison, analyze two sets of files and synchronize them, making the two sets identical with little or no help from you. Given a source and a destination, rsync makes all destination files match those at the source. unison works in both directions, automatically making any changes that don’t conflict and asking you about the rest.
Does wget Get It Right?
To keep up-to-date, local copies of some remote files, you could constantly copy and recopy all of them. However, that wastes a lot of bandwidth, especially if only a few (or none) of the remote files have changed recently.
How can you tell whether any remote files are different from your local copy? One obvious way is by comparing file sizes: If the files have different lengths, they’re different. You could also try comparing timestamps, specifically the last-modified date and time. wget (covered in the April, 2003 column) uses both methods when it’s mirroring a remote server.
But those methods don’t always work. Why? First, two files with the same size and name can can have small (or great) differences. Second, the granularity of timestamps is too great. For instance, a typical timestamp from an FTP server looks like ls -l output: Only the date, hour, and minute that a file was last changed is recorded (or, for files more than six months old, only the month, day, and year of the last change). HTTP servers do better than FTP, but there’s still a chance that two files with the same timestamp are different. Finally, it’s easy to change a file’s timestamp without changing its contents — with the GNU touch -t command, for example.
So, to be sure that your local and remote files are identical, do you have to copy all of them every time? No, not if you use rsync.
File Signatures and rsync
A photo snapshot of yourself lets people see you without you being there in person. In the same way, you can make a mathematical “snapshot” of a file by calculating its file signature. A file signature is a string of characters that represent the file. Any change to a file changes its signature, and because a file signature is typically much, much smaller than the file it represents, comparing signatures — even across a network — is very cheap and fast.
And that’s just the idea behind rsync. rsync compares signatures of each file pair, where one file is local and the other is either local or remote. Files with different signatures are different and need to be updated.
rsync was designed to create signatures “good enough” to catch all possible differences while still being thrifty with CPU time and network bandwidth. The details of how rsync works can be found in Andrew Tridgell’s PhD thesis at http://samba.org/~tridge/phd_thesis.pdf.
Introducing rsync
rsync is designed to update remote data efficiently over a high-latency, low-bandwidth connection like a dialup modem. Of course, you can also use it on a fast network or even just on your LAN or individual system where you may not need some of its bandwidth-saving features.
Your online rsync man page should have lots of information, and you can find more at rsync’s home site at http://rsync.samba.org. Let’s start with a quick overview, then dig into some power tips.
rsync makes a destination set of files or directories identical to a source set. The basic command-line syntax is like scp or rcp, but with more options:
rsync [options] src [srcs...] destination
src and destination can be either local pathnames or a remote specification, including host:path, host::path, user@host:path, or user@host::path. A single colon (:) uses a remote shell program like ssh and a double colon (::) specifies a remote rsync server. While there can be many sources, there can be only one destination (just like cp or scp), which can be either a local file or directory or a remote specification. If all arguments are local (with no colons or hostnames), rsync runs locally — and that can be useful too. Finally, don’t miss the sidebar “Trailing Slashes in rsync.”
Using rsync Locally
One problem with cp, rcp, and scp is that they don’t preserve hard links and symbolic links at the destination. Instead, they copy the file that the link points to in place of the link. The usual workaround for this is to use two tar processes connected with a pipe (|). One tar process runs and reads from the source, while the other runs in the destination directory in a subshell, like this:
$ cd src
$ tar cf - . | (cd dest && tar xf -)
As we saw in the March, 2003 column, you can also run that mess through an ssh connection to copy a directory tree to a remote host. But rsync makes it simpler. Here’s the local version:
$ cd src
$ rsync -rtpl . dest
Here, the command copies the contents of the current working directory (“dot”) to dest. The -r flag tells rsync to copy recursively; the -t flag preserves timestamps; -p preserves access permissions (read, write, execute); and -l (lowercase “L”) preserves symbolic links. There’s also a -H flag to preserve hard links.
See the “OPTIONS” section of the rsync man page or type rsync -help. (Check out the -a “archive” option, equivalent to -rlptgoD.)
|
Trailing Slashes in rsync When rsync sees a trailing slash (/) on a source name, it will copy the contents of that directory. Without a trailing slash, rsync will copy the directory too. The difference is especially important with the -delete option! If you use filename completion (where you can type part of a file or directory name, then press TAB or ESC to have the shell finish it), be careful: Filename completion can add a trailing slash (/) to directory names. |
rsync via ssh
If a host and pathname have a single colon (:) between them, rsync opens a connection via rsh (which is insecure) or ssh (if you add -e ssh). Assuming you use ssh, the remote host doesn’t need an rsync server; the remote ssh process launches rsync for you. (If the remote process can’t find the rsync program, add the command-line option --rsync-path=full-path when you invoke rsync.)
Here’s the previous example again, writing the contents of your current working directory to the subdirectory backup1 in your home directory on the host foo. Let’s add the -z option to compress the data before sending it:
$ rsync -rtplz -e ssh . foo:backup1
If the destination (here, backup1) doesn’t exist, rsync creates a directory with that name and writes the files into it. For example, to create a series of snapshots over time, simply use different destination directory names. Here’s a bash alias to do that.
alias backup='rsync -rtplz -e ssh . foo:backup.`date "+%y%m%d%H%M%S"` &'
It copies the current directory recursively to a destination directory with a name like backup.030415123456, where the first two digits are the year, the second two are the numeric month, and so on. The ampersand (&) on the end tells the shell to run rsync in the background so you can get right back to work. (If your shell is tcsh, use a space character instead of the =.)
That alias makes a complete, new backup of your current directory. Making a lot of those backups can take a lot of disk space. Instead, you might want to make and update just one remote backup. That’s what rsync is best at: finding the changes and sending only those files. You simply need to give the name of an existing directory on the remote host. rsync will analyze the differences (as explained earlier) and send only the files that have changed. (If you delete a local file, though, it won’t be deleted from the remote directory on foo unless you use -delete.) We’ll add the -v flag to show what’s happening:
$ alias bk='rsync -rtplzv -e ssh . foo:backup'
$ bk
building file list ... done
created directory backup
./
b/
b/abfile
link1
symlink1 -> link1
wrote 285 bytes read 64 bytes
total size is 50 speedup is 0.14
The local directory has one symbolic link (named symlink1), two files and a subdirectory. Let’s overwrite the little link1 file with 409048 bytes, then re-run bk:
$ cp /usr/dict/words link1
$ bk
building file list ... done
link1
wrote 131060 bytes read 32 bytes
total size is 409098 speedup is 3.12
The two summary lines show that rsync did an efficient job.
|
Power Tip: More about less The incredibly handy file browser less has a lot of features worth mentioning. Here are a few.
|
Running with the Daemon
rsync runs as a server if you start it with the -daemon option. The server can be started on-demand from a facility like xinetd or it can run standalone.
Users can synchronize their files against one or more sets of files on the server’s host. Each set of files is called a module. When an rsync command-line argument has a double colon between the hostname and the path — like foo::module — the rsync client synchronizes with the named module on host foo. If no module names are given (for instance, rsync foo::), you’ll get a list of the modules available on that server. Here’s an example:
$ rsync foo::
skel Skeleton files for new users
webhome Master files for www*.bar.xyz
And here are the configuration file entries for one of the two modules on foo:
[webhome]
 path = /proj/web/htdocs
 comment = Master files for www*.bar.xyz
 read only = yes
 auth users = www, sys
 secrets file = /local/etc/rsyncd.users
After the daemon starts, it chroots to the directory listed on the path entry, so only the contents of the directory path (and its subdirectories) are accessible through the server. For example, to copy the server’s directory tree /proj/web/htdocs into the current directory, use:
$ rsync -a foo::webhome/ .
Password:
The password is checked against the module’s “secrets file.” Although this file shouldn’t be world-readable, the password is stored in clear text and any root user can read it!
If you’d rather not type the password every time, you can can add the password to the environment of the shell on the client host. Use export or setenv from the command line or from your shell setup file to set the RSYNC_PASSWORD environment variable. Watch out, though: On some systems, any user can see the environment of any process (and find the password).
In our examples, the webhome module has the master copy of files and directories for a company web site that’s distributed across multiple hosts. Each host synchronizes its filesystems with webhome periodically by using cron jobs that run at different times (to avoid overloading the master host). Here’s a sample crontab entry:
3 10,17 * * * RSYNC_PASSWORD=xxxx rsync
 -aq --include “/**” --include “*.html”
 --exclude “*” foo::webhome/ /www/docs
(It’s shown on three lines, but it all must be on a single crontab line.) Command lines for Bourne-type shells — which cron typically uses — can start with an environment variable name and a value that are used only for that particular command. (This works from a prompt too, not just in a crontab.) It’s a handy way to set the rsync password — although the password will be stored in clear text in the crontab file, where any root user can see it.
The --include and --exclude options are described in the man page. We’ve chosen an example that shows some of their features. Here we want to copy only files whose names end with .html from any subdirectory of the server’s /proj/web/htdocs directory. For example, /proj/web/htdocs/contact/cs.html on the server should be copied to /www/docs/contact/cs.html on the local host, but other files shouldn’t be copied.
The first option, --include "/**", allows all files recursively from the root directory down. (The double asterisk, **, makes the pattern apply to all levels of subdirectories. A single asterisk would apply it only to a single directory.) The leading slash, makes this pattern apply from the module’s root.
The second option, --include "*.html", includes all the files we want. We’ve quoted all of the wildcard patterns so cron’s shell will pass them unmodified to rsync.
The third option, --exclude "*", excludes all files not explicitly matched earlier. This is important because if no pattern matches, the file is included by default.
Two-way Synchronization with Unison
rsync is great where one set of files (local or remote) is “the source.” If both sets of files have changes you want, you’ll need an intelligent way to make both sets of files match. Unison handles that — automatically, in many cases. If both the local and remote versions of a particular file have changed, Unison shows the differences and asks you to choose which file is correct.
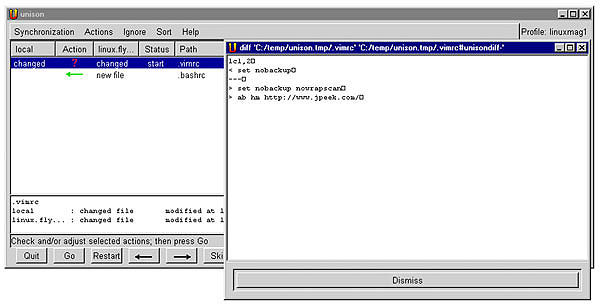 |
| Figure One: Unison synchronizing a Windows and Unix host |
That’s the situation in Figure One. The wide window shows a list of all changes that Unison found; one of the files (.bashrc) will be transferred automatically if you approve. The other file (.vimrc) has overlapping changes, so Unison has opened a window (in the Unix diff format) showing the differences.
Unison has both GUI and command-line interfaces. Internally, Unison actually uses the rsync protocol. Unison also works on many versions of Windows — but you’ll need a Unix-like ssh utility, too. (You might want to get GNU Software for Windows. Read about it at http://www.gnu.org/doc/windows.html.) Unison’s home page is currently http://www.cis.upenn.edu/~bcpierce/unison.
That’s (Almost) All, Folks...
One more note about rsync: if you don’t supply a secrets file configuration entry, a module will be available without a password. This is called anonymous rsync, and it’s an efficient way to synchronize a set of files with multiple users all over the Internet.
Jerry Peek is a freelance writer and instructor who has used Unix and Linux for over 20 years. He’s happy to hear from readers; see https://www.jpeek.com/contact.html.