Last month’s column dug into some of the handy new (ish) features of the indispensable ls. This month, let’s look at what used to be the family of grep s — now unified into a single program — with even more ways to search for text and control the output.
Combined Versions
Years ago, there was a saying that Unix beginners use grep because it’s all they know about, intermediate users use fgrep because it’s supposed to be faster, and advanced users use egrep because they’ve tested it. Each of those three variations used to be its own separate program that did different searches. But no more. The single GNU grep binary has a -F switch to do fixed-string searches like fgrep and a -E switch to do extended regular expression-powered egrep searches. GNU egrep is simply a shell script now, like this:
#!/bin/sh
exec grep -E ${1+“$@”}
So now, plain old grep may actually be a bit faster because it doesn’t start a shell as this egrep does. (The strange-looking ${1+“$@”} in that script is a workaround for old Bourne shells. The sidebar “When Shouldn’t a Parameter Be?” explains.)
Context
Another change in grep is that you don’t have have to use the -c (“context format”) option to see lines of context around a match. The option -C N shows N lines of context around each matching line. Also, -B N shows N lines of context only before each match, and -A N shows N lines of context only after each match. Adding line numbers with the -n option makes this easy to see; otherwise, finding the matches can take a little inspection (or use the --color option, discussed later).
Listing One shows an example: searching for oodle in the system’s dictionary file with one line of context around each match. Matching lines start with a colon (:) and context lines start with a dash (-); each group is separated by a line with exactly two dashes (--).
$ grep -C 1 -n oodle /usr/dict/words
.
38024:doodles
38025-doodling
-
63548-nonzero
63549:noodle
63550:noodle's
63551:noodles
63552-nook
-
64559-onyxes
64560:oodles
64561-oops
-
69602-pooching
69603:poodle
.
If you want the leading colons and dashes but don’t want the line numbers, strip the numbers by piping grep ‘s output through sed 's/^[0-9]*//'.
Only Show Matching Text
grep is line-oriented. (But see the --binary-files option later.) When it finds a pattern match, grep outputs the entire line where a match is found. (That is, it outputs the character just past the preceding newline, up to and including the next newline. This line orientation is part of why grep can’t search for a pattern containing a newline.)
There are times when you don’t want the whole line; you just want the matching pattern. That’s where the new -o “only matching text” option is handy.
For example, in a file full of phone numbers, first and last names, you could search for names starting with Ab this way:
$ grep Ab phone
505-837-2938 Abby Abbott
212-940-2039 Abel Baker
301-302-3030 Abigail Adams
.
$ grep -o 'Ab[^ ]*' phone
Abby
Abbott
Abel
Abigail
(The regexp Ab[^]* matches Ab and all following characters that aren’t a space. Without that, grep -o Ab would simply output the string Ab four times.) Notice that -o output two words from Abby Abbott on separate lines.
The -o option is great for learning and testing complex regular expressions.
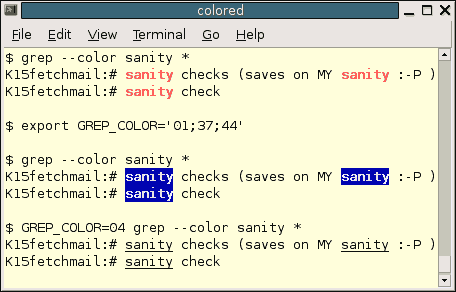
Color
The -o option in the previous section gives just the matching text. Spotting the match in context — that is, in the middle of its line — isn’t always easy. The option --color (also --colour) can solve that problem. It highlights the matching text in bright red, by default. The color is configurable, but the documentation doesn’t explain much. Let’s take a look.
The --color option has three optional “when” choices: --color=always, --color=auto, and --color=never. (Note that the last choice is different than what ls uses: --color=none.) To understand these, you first need to understand how grep makes the color.
grep outputs ANSI escape sequences to “turn on” color before it outputs each matching string and to “turn off” color (go back to the default color) afterward. (Escape sequences are explained in the September 2003 column “(Not So) Stupid Shell Tricks” and its supplememtal page.)
The “automatic” option --color=auto outputs the color-making escape sequences if grep ’s standard output is a terminal; otherwise it doesn’t. This isn’t always right, though. For instance, if you’re piping grep ’s output to sed for editing and showing sed output on the terminal, you’ll have to force grep to output the escape sequences by using --color=always.
To see how the escape sequences work, let’s pipe grep output to cat -v, which shows non-visible characters visibly:
$ grep --color=always Adam names | cat -v
^[[01;31mAdam^[[00m Smith
John ^[[01;31mAdam^[[00ms
The escape sequence to turn on bright red is ^[[01;31m, where ^[ represents an ASCII ESC character. The ^[[00m turns it off.
You can choose the color by setting the GREP_COLOR environment variable. Although the GNU info file for grep says that this variable contains the “surrounding markers”, it actually holds the string that’s placed between the opening ^[[ and the closing m in the first escape sequence of a pair. So, for bright white text on a blue background, set GREP_COLOR to 01;37;44. You can set this in a shell setup file like .profile.
Bourne-type shells also let you set an enviromment variable for a single command. Let’s try that. See how GREP_COLOR is copied into the grep output:
$ GREP_COLOR='01;37;44' grep --color=always Adam names | cat -v
^[[01;37;44mAdam^[[00m Smith
John ^[[01;37;44mAdam^[[00ms
Figure One shows a screen shot with the default grep --color output, with a new default value of GREP_COLOR set, and with a temporary GREP_COLOR for a single command line. Notice that you don’t have to use colors: you can use monochrome effects (04 makes underlining), making grep --color useful even on monochrome displays.
Searching Non-text Files
Using the original grep with wildcards (grep pattern*), or searching a directory tree recursively, meant that grep might search non-text files and yield results you didn’t want.
Traditional grep was line-oriented. It expected, and searched, newline-delimited lines. The newer grep tests the first few bytes of a file, trying to decide whether it’s plain text. If a file doesn’t seem to be text, grep won’t output matching text (which is likely garbage that could scramble your screen). Instead it prints a message like Binary file /foo/bar matches when it finds a match within a file.
The option --binary-files= type controls this:
*The default (just explained) is --binary-files=binary.
*If you use --binary-files=without-match, grep ignores files that it decides are binary; it won’t output anything for those files. A shorter name for this option is -I.
*With --binary-files=text, grep reverts to its old behavior, spewing out whatever “lines” contain a matching pattern. The -a option does the same.
If you want to see the matching text safely, try piping grep ‘s output through a binary-to-text filter like cat -v or od -c. The less pager also typically shows binary text in a safe way.
Handling “Files” That Aren’t
On Linux systems, I/O is done through file-like filenames. Not all of those “files” are actual disk files, though. They could be sockets, FIFO s, and more. They can also be directories, which are disk files in a special format.
Of course, you can use find -type to pass only certain types of filenames to grep. For instance:
$ grep “pattern” `find.-type f -print`
Now, two GNU extensions help with these problems:
*The switches -d action and --devices= action tell grep what to do when an input file is a device, FIFO, or socket. An action of skip silently skips these “files.” The default action is read, which treats devices the same as text files.
*The switches -D action and --directories= action tell grep what to do with directories. The action of read treats directories like plain files, and this is the default. You’ll probably want to use skip instead. The third choice is recurse. It reads the filename entries and recursively descends into that directory, searching those files. This last choice is the same as the -r option.
Just the Filenames, Please
One longstanding grep option is -l (lowercase “L”). With this option, grep searches the files named on the command-line and outputs the names of files that contain a match. This is handy for cases like reading all log files that contain an error:
$ less `grep -l ERROR *`
The problem with that option came when you wanted the names of files that didn’t contain the matching string. A clever but ugly trick was to use grep -c to output the count of matches in each file, and a little sed expression to return the names of files with a count of 0 (no matches).
First, let’s see the raw output of grep -c, then the trick:
$ grep -c ERROR *
cd_log:0
lp_log:2
mn_log:0
.
$ grep -c ERROR * | sed -n '/:0$/s///p'
cd_log
mn_log
.
$ less `grep -c ERROR * | sed -n '/:0$/s///p'`
.
Using backquotes (`.`) in the latter less command translates to cd_log and mn_log, so less shows those two files.
The option -n tells sed not to print by default. On each line ending with :0 (/:0$/), remove that pattern and print the rest of the line (s///p), which outputs the filename.
As slick as that trick is, it’s a pain to type. The GNU grep option -L does the same thing:
$ less `grep -L ERROR *`
Stop After N Matches
One good reason to use -l (covered in the previous section) is that grep doesn’t need to search the whole file: as soon as it found a match in one file, it can start scanning the next file. That saves time and I/O.
If you know or suspect that a file has a lot of matches, the options -m num or --max-count= num tells grep the maximum number of matches num to show from each file. This is much more efficient than the old way to limit the number of output lines per file:
patt='pattern'
max=3
for file in * ; do
  grep “$patt” “$file” /dev/null | head -$max
done
The old grep wouldn’t output the name of a matching file if you gave it only one filename argument. The standard workaround for that was to also give /dev/null, which is guaranteed not to contain a match because reading it always returns zero bytes. In GNU grep, the -H option tells grep to show the filename even with a single argument.
There’s more about -m and a few other new options too in the grep info file. (Type info grep.)
Jerry Peek is a freelance writer and instructor who has used Unix and Linux for over 20 years. He’s happy to hear from readers; see https://www.jpeek.com/contact.html.