Do you spend a lot of time moving around the filesystem with cd commands, typing ls to see what’s there? Do you build lists of arguments on the command line using wildcards or filename completion? If you do a lot of work with files and directories, vshnu (http://www.cs.indiana.edu/~kinzler/vshnu) is worth a look.
vshnu (pronounced “vish-new”) is a “visual shell” that runs in a terminal window. vshnu lists the current directory so you can find files quickly. Select the file or files you want, then run either a built-in command or any other arbitrary command — a shell utility or any Perl code — on those files.
vshnu comes from the early-1980s vsh; the “nu” implies new, and as Steve Kinzler, the author of vshnu says, the name “invokes the Hindu god Vishnu, the preserver of the universe and restorer of dharma (moral order).” Hmmm, how appropriate.
The premise of vshnu is similar to mc, the GNU Midnight Commander (http://www.ibiblio.org/mc/), but the interface is different. Underneath, vshnu is Perl code, with Perl configuration files, which makes it easy to configure or hack. (You don’t need to be a Perl monk to use vshnu! There are a few Perl-isms here and there, but the rest is quite comprehensible.)
vshnu has been around for years, but there’s not much introductory documentation. Let’s get an overview — enough to get you started, so you can learn more on your own.
Setting up vshnu
vshnu runs from a console or terminal window, and supports color if the terminal does.[ Details of how color in the terminals works can be found in the June 2005 column “What’s GNU, Part One”. See the section about the LS_COLORS variable, (which vshnu uses, too).]
Before you start vshnu for the first time, open a console or terminal window and check its environment (with env or printenv). If TERM and LS_COLORS haven’t been set correctly, settings like these may help from a bash shell:
export TERM=xterm-color
eval $(dircolors)
Or, if you use tcsh, try these settings instead:
setenv TERM xterm-color
eval `dircolors`
There’s more setup information on the vshnu home page and in the README file in its tarball. For more about the color files, see the sidebar “dircolors Files.”
The vshnu interface
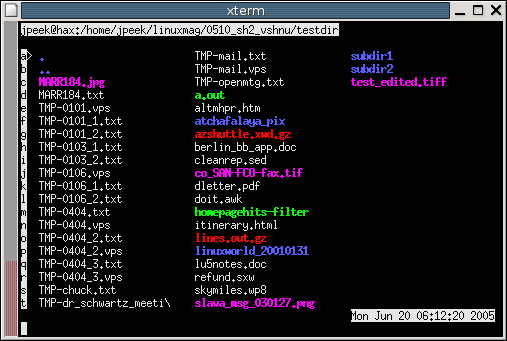
When vshnu starts, it shows the file and directory names in your current working directory (at the time you launched vshnu). See Figure One. If the directory has too many entries to fit in the first window, you can press Space to see the next screenful of entries. Press Space enough times or press 0 (the digit zero) to return to the first screen.
To see a list of vshnu commands, press the % (percent) key. To understand those commands, though, you first need to know more about what’s behind this deceptively simple interface.
A directory listing is split into columns. One of those columns has a column of letters next to it (a, b, and so on) — that’s the selected column, and it’s called the bag. In Figure One, the bag is the left-most column. One way to move the bag is with the right and left arrow keys.
| Mode | Key | Label | Description |
|---|---|---|---|
| main | The starting (and most commonly used) mode. | ||
| choose | / | keys=choose | Add one or more entries to the chosen file set |
| opts | O | keys=opts | Set/unset options for sorting and listing display. (Uppercase letter“ O”) |
You can choose an entry from the bag by typing its letter — but, if you’re following along on a terminal as you read this, don’t type a letter yet! You need some more information first.
| Mode | Key | Label | Description |
|---|---|---|---|
| edit | The starting mode for editing files and entering directories. | ||
| do | ? | types=do | The action taken depends on the type of file: image files are viewed, archive files’ contents are listed, and so on. |
| expand | " | types=expand | The selected directory is expanded to show its entries or is collapsed if it’s currently expanded. |
vshnu has two sets of modes:
*The key command modes, listed in Table One, choose what happens when you use a key command. Pressing the % (percent) key gives a list of key commands in your current key-command mode.
*The file action modes, listed in Table Two, determine what happens when a file is selected. Pressing the & (ampersand) key gives a list of file actions in your current file-action mode.
Typing a key from Table One and Table Two toggles the mode. For instance, if you previously pressed / to enter Choose Mode, you stay in “Choose Mode” until you press / again.
The current modes are shown at the bottom-left corner of the terminal. For instance, if you press / to enter Choose Mode and ? to enter Do Mode, the bottom-left of your screen should say keys=choose, types=do. Typing ? again would cancel Do Mode.
What can you do in each mode? The keys on your keyboard — letters, numbers, and control characters like Control-N — give commands to vshnu. (Also see the sidebar “Here’s a Tip: Using the% and& amp; keys.”)
Let’s take a quick look at each mode.
First Key-Command Mode: Main Mode
vshnu’s Main Mode is used to navigate through the directory tree and to edit single files. (Of course, you can often use an editor to view a file.) To view or edit files that your editor can’t handle, use Do Mode (or see the tip in the sidebar “Choosing your Editor.”)
In the Main Mode (with no types= or keys= at the terminal’s bottom left):
*Press the letter next to a file in the bag to open that file with an editor.
*Press the letter next to a directory to change to that directory and display it; in any directory, press Enter (Control-M) to change to its parent directory.
For instance, in Figure One, pressing d edits the file MARR184.txt. If the bag had been the second column, pressing f would change the current directory to atchafalaya_pix (directories are shown in blue) and list that directory on the terminal.
File-action Modes: Edit and Do Modes
Edit Mode is the default file-action mode. Here, if you press a key, a file is edited or a directory is entered right away. In the second file-action mode, discussed momentarily, vshnu takes the default action instead of always editing a file.
In Do Mode, you’ll see types=do at the bottom-left corner. If you’re in the Main key-command Mode at this point, typing the letter of a bag entry won’t edit the file or enter the directory (as it would if you weren’t in Do Mode). Instead, vshnu executes the default action on that file or directory.
To see the default action for each entry, press & (ampersand). You’ll get a listing like Figure Two, but much longer. The left column shows the Perl code used to choose an action. Each of these tests is tried, from first to last, until a matching test is found; that’s the action that’s used. If the description is grey, that’s the name of a Perl routine; the other descriptions, in blue-green, describe the action.
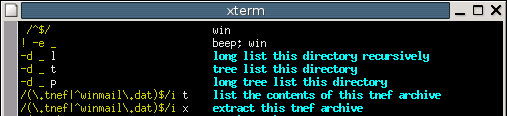
For instance, if there’s no entry selected (C/^$/), the window is simply redrawn. If the entry doesn’t exist (!-e _), it was probably deleted outside of vshnu), so vshnu beeps and runs win. If the entry is a directory (-d _), you’re prompted with three choices: l to show a long listing, t to show a tree listing, and p for a long tree listing. Then follows a long list of actions for files. If you aren’t a Perl hacker, grab a Perl cheat sheet or reference; the left column is mostly Perl’s extended regular expressions.
If none of these actions match a file, vshnu searches your mailcap files for an action.
Second Key-Command Mode: Choose Mode
Use Choose Mode to select multiple files. This is different from Main Mode: in Main Mode, vshnu takes action on a file as soon as you type the letter next to its name; however, in Choose Mode, no action is taken until you’re finished choosing files and you give an action command.
To enter Choose Mode, type / (see Table One). The bottom left should show keys=choose. When you type the letter next to an entry in the bag, a number appears next to the name: 1 for the first file chosen, 2 for the second, and so on. To un-choose the previously-chosen file, use Control-X.
You can choose files in multiple directories. To change directories, leave Choose Mode temporarily (press /), press the letter key next to a directory (which takes you there instead of “choosing” the directory), then re-enter Choose Mode by pressing / again. Any previously-chosen files are remembered. Or use Expand Mode (explained below) to expand subdirectories without entering them.
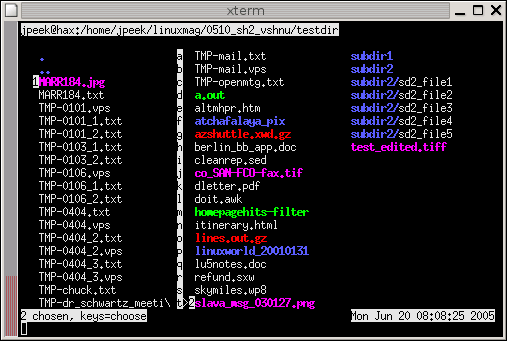
Figure Three shows Choose Mode with two files chosen. (The subdirectory subdir2 was also expanded during Expand Mode.)
Once you’ve chosen a set of files, one possible action is to press Control-E to execute the default command on each file chosen. Or you can (as usual) type % for a list of actions. For instance, you can edit all of the files with E (as with all commands, it’s not lowercase because lowercase letters choose files from the bag). If the action requires more information — like the username for chown — vshnu prompts you.
One action worth explaining is passing the chosen filenames to a command run from a shell. Type : (colon) if you want to see the output of the shell command or ; (semicolon) if you don’t. Figure Four (grabbed shortly after Figure Three) shows an example. There are three steps:
1.After typing : or ;, you’ll be prompted with (Shell:. Type the command name and any initial options or arguments. The filenames you chose will be inserted after these initial words.
2.When you press Enter, you’ll be prompted with Shell):. Here, you can type any final arguments. (In this example, another pathname was added to the end of the command line.)
3.Press Enter again to show the completed command line and run it. When the external command exits, vshnu prints Press Return. Press Enter to return to the display.

An alternative: if you installed the Perl Term::ReadLine::Gnu, type Meta-V while entering a line of text and vshnu gives a menu of things that can be inserted at this point: the chosen files, the current directory, and more.
After running a command, files are un-chosen and you leave Choose Mode. Control-R re-chooses the same files and puts you in Choose Mode again.
Third File-Action Mode: Expand Mode
Pressing " (double quote) enters Expand Mode. In Expand Mode, typing the letter next to a directory name doesn’t change to that directory and display it. Instead, Expand Mode shows the subdirectory entries within the same bag. Figure Three shows an example: the bag was the right column, and b was pressed to expand subdir2. Its entries became c through g in the bag.
The Y (expand all) and U (collapse all) commands are also handy.
As with the other modes, you can leave Expand Mode by typing " again.
Third Key-Command Mode: Opts Mode
To enter Opts Mode, press O (uppercase letter “O”). This mode sets and unsets various display sorting and listing options. As usual, % gives a complete options list. This mode exits automatically after an option key is selected.
You can set default options by editing your ~/.vshnurc file. Near the end of the default vshnurc.pl file, look for this line.
$optons .= 's' unless $optons =~ /s/;
. and use the .= operator again to add more options.
Suspending, Quitting
Typing Control-Q or Control-Z displays a brief menu of commands to reload the vshnu configuration file, restart, suspend, or quit. Suspending is like the standard Linux suspend command Control-Z: vshnu becomes a stopped job that you can re-start with the shell’s fg command.
Much More...
The author of vshnu writes that “Coming in a future release is mouse support in xterm and Linux consoles. A development version recognizes mouse events, but I need to work on a structure for specifying mouse actions and a good set of defaults.”
This month’s column has covered only the basics of vshnu. Typing % in each mode gives you a long list of other features. For instance, from the Main Mode, Control-C lists the chosen files and Control-D lists the directories you’ve visited. (If the documentation mentions the “point,” it’s the file in the bag with an arrow (>) next to it.)
There are many, many possibilities. As with a complex editor like emacs or vi, memorizing the most useful commands help you take advantage of vshnu’s speed and power.
Jerry Peek is a freelance writer and instructor who has used Unix and Linux for over 20 years. He’s happy to hear from readers; see https://www.jpeek.com/contact.html.